WireGuard Setup Home Client <-> VPS Hub <-> Mobile Client
This guide sets up a fully WireGuard VPN environment with three nodes:
- Virtual private Server acting as the central hub (public IP, always reachable)
- Raspberry Pi at home acting as a gateway into your home LAN
- smartphone connecting through the VPS to reach both the VPN and your home network
This works even if your ISP uses DS-Lite / CGNAT (no inbound IPv4 at home), because the Pi always connects outward to the VPS.
Architecture
VPN Traffic Flow
├── 1. Home Tunnel (Pi → VPS)
│   └── Pi dials the VPS at boot. PersistentKeepalive keeps the
│       tunnel alive through the home router's NAT. DS-Lite friendly.
├── 2. Mobile Client (Phone → VPS)
│   └── Phone connects to the VPS's public IP.
│       VPS routes home-subnet traffic down the Pi tunnel.
└── 3. Home LAN Access (VPS → Pi → 192.168.0.x)
    └── Pi NAT-masquerades the packet so home devices reply correctly.
        No port forwarding on your home router needed.
Network Overview
| Role | Device | WireGuard IP | LAN |
|---|---|---|---|
| Hub | VPS | 172.31.0.1 | public IP |
| Home Gateway | Raspberry Pi | 172.31.0.2 | 192.168.0.x |
| Mobile Client | Smartphone | 172.31.0.3 | dynamic |
The VPN subnet is 172.31.0.0/24. Adjust 192.168.0.0/24 to match your actual home LAN.
Prerequisites
- VPS running Debian/Ubuntu with a public IPv4 address
- Raspberry Pi (or any Linux device) running 24/7 on your home LAN, connected via LAN cable
- WireGuard app installed on your smartphone (iOS or Android)
- SSH access to both VPS and Pi
Install WireGuard on the VPS
SSH into your VPS:
sudo apt update && sudo apt install wireguard -yEnable IP forwarding so the VPS can route packets between the Pi tunnel and the phone tunnel:
sudo nano /etc/sysctl.conf
# Uncomment or add this line:
# net.ipv4.ip_forward=1

sudo sysctl -p
Verify:
sysctl net.ipv4.ip_forward
# Expected: net.ipv4.ip_forward = 1
Generate Keys on the VPS
cd /etc/wireguard
umask 077
wg genkey | tee privatekey | wg pubkey > publickey
chmod 600 privatekey
cat privatekey   # you need this below
cat publickey    # note this — the Pi and phone need it
Keep a notepad open. You will need the VPS public key in Steps 5 and 7.
Configure WireGuard on the VPS
Create the WireGuard config. The VPS manages both the Pi and the phone as peers.
SaveConfig = false prevents WireGuard from overwriting this file at shutdown.
Always use this when configuring peers manually.
sudo nano /etc/wireguard/wg0.conf[Interface]
PrivateKey = <VPS privatekey>
Address = 172.31.0.1/24
ListenPort = 51820
SaveConfig = false
# Replace eth0 with your actual outbound interface (check with: ip a)
PostUp = iptables -A FORWARD -i wg0 -j ACCEPT; iptables -t nat -A POSTROUTING -o eth0 -j MASQUERADE
PostDown = iptables -D FORWARD -i wg0 -j ACCEPT; iptables -t nat -D POSTROUTING -o eth0 -j MASQUERADE
# Home Raspberry Pi
[Peer]
PublicKey = <Pi publickey>
# Route both the Pi's VPN IP and the entire home subnet through this peer.
# When the phone asks for 192.168.0.x, the VPS sends it down this tunnel.
AllowedIPs = 172.31.0.2/32, 192.168.0.0/24
PersistentKeepalive = 25
# Smartphone
[Peer]
PublicKey = <Phone publickey>
# Phone has no subnet behind it — only its own VPN IP.
# No Endpoint: the VPS learns the phone's current IP when it connects.
AllowedIPs = 172.31.0.3/32Check your outbound interface name. Run ip a on the VPS and look for the interface with your public IP — it may be ens3, enp1s0, eth0, etc.
Open the firewall port:
sudo ufw allow 51820/udpInstall WireGuard on the Raspberry Pi
SSH into your Pi:
sudo apt update && sudo apt install wireguard -yEnable IP forwarding:
echo "net.ipv4.ip_forward=1" | sudo tee -a /etc/sysctl.d/99-sysctl.conf
sudo sysctl -p
Generate the Pi’s key pair:
cd /etc/wireguard
umask 077
wg genkey | tee privatekey | wg pubkey > publickey
chmod 600 privatekey
cat privatekey   # you need this below
cat publickey # put this in the VPS config (Step 3) and note itIf you haven’t filled in the Pi’s public key in the VPS config yet, go back and do that now before starting WireGuard.
Configure WireGuard on the Pi
sudo nano /etc/wireguard/wg0.conf[Interface]
PrivateKey = <Pi privatekey>
Address = 172.31.0.2/24
# Slightly smaller MTU to avoid packet fragmentation (WireGuard adds overhead).
MTU = 1420
# Comment out DNS — the Pi is a router, not a DNS client.
# Uncommenting this requires resolvconf installed on the Pi.
#DNS = 1.1.1.1
# NAT masquerade: makes home LAN devices see traffic as if it came from the Pi.
# Without this, home devices would try to reply directly to 172.31.0.3 — which
# they don't know how to reach. Replace eth0 with your LAN interface (ip link show).
PostUp = iptables -t nat -A POSTROUTING -o eth0 -j MASQUERADE
PostDown = iptables -t nat -D POSTROUTING -o eth0 -j MASQUERADE
[Peer]
PublicKey = <VPS publickey>
Endpoint = <YOUR_VPS_IP_OR_DOMAIN>:51820
# Only route VPN subnet traffic through the tunnel.
# The Pi keeps its normal internet access via the home router.
AllowedIPs = 172.31.0.0/24
# Keeps the tunnel alive through the home router's NAT.
# The Pi dials out every 25 seconds so the VPS can always reach it inbound.
PersistentKeepalive = 25Check your LAN interface name. On Raspberry Pi OS Bookworm, the LAN interface is often end0 instead of eth0. Run ip link show and look for the interface marked state UP that is not lo or wg0.
Start WireGuard on the VPS and Pi
Start both sides and enable them on boot:
sudo systemctl enable --now wg-quick@wg0sudo systemctl enable --now wg-quick@wg0Verify the tunnel is established on the Pi:
sudo wg showYou should see the VPS listed as a peer with a latest handshake timestamp a few seconds old. If it shows (none), double-check the VPS endpoint and that port 51820/udp is open.
Verify on the VPS:
sudo wg show
# Pi peer should show a handshake and the 192.168.0.0/24 allowed IP.
Ping test across the tunnel:
ping -c 4 172.31.0.1 # Should reach the VPSping -c 4 172.31.0.2 # Should reach the PiGenerate and Setup the Phone Config
The phone needs its own key pair. The easiest way is to generate it directly in the WireGuard App.
Create a new tunnel: Open the WireGuard app → tap + → Create from scratch.
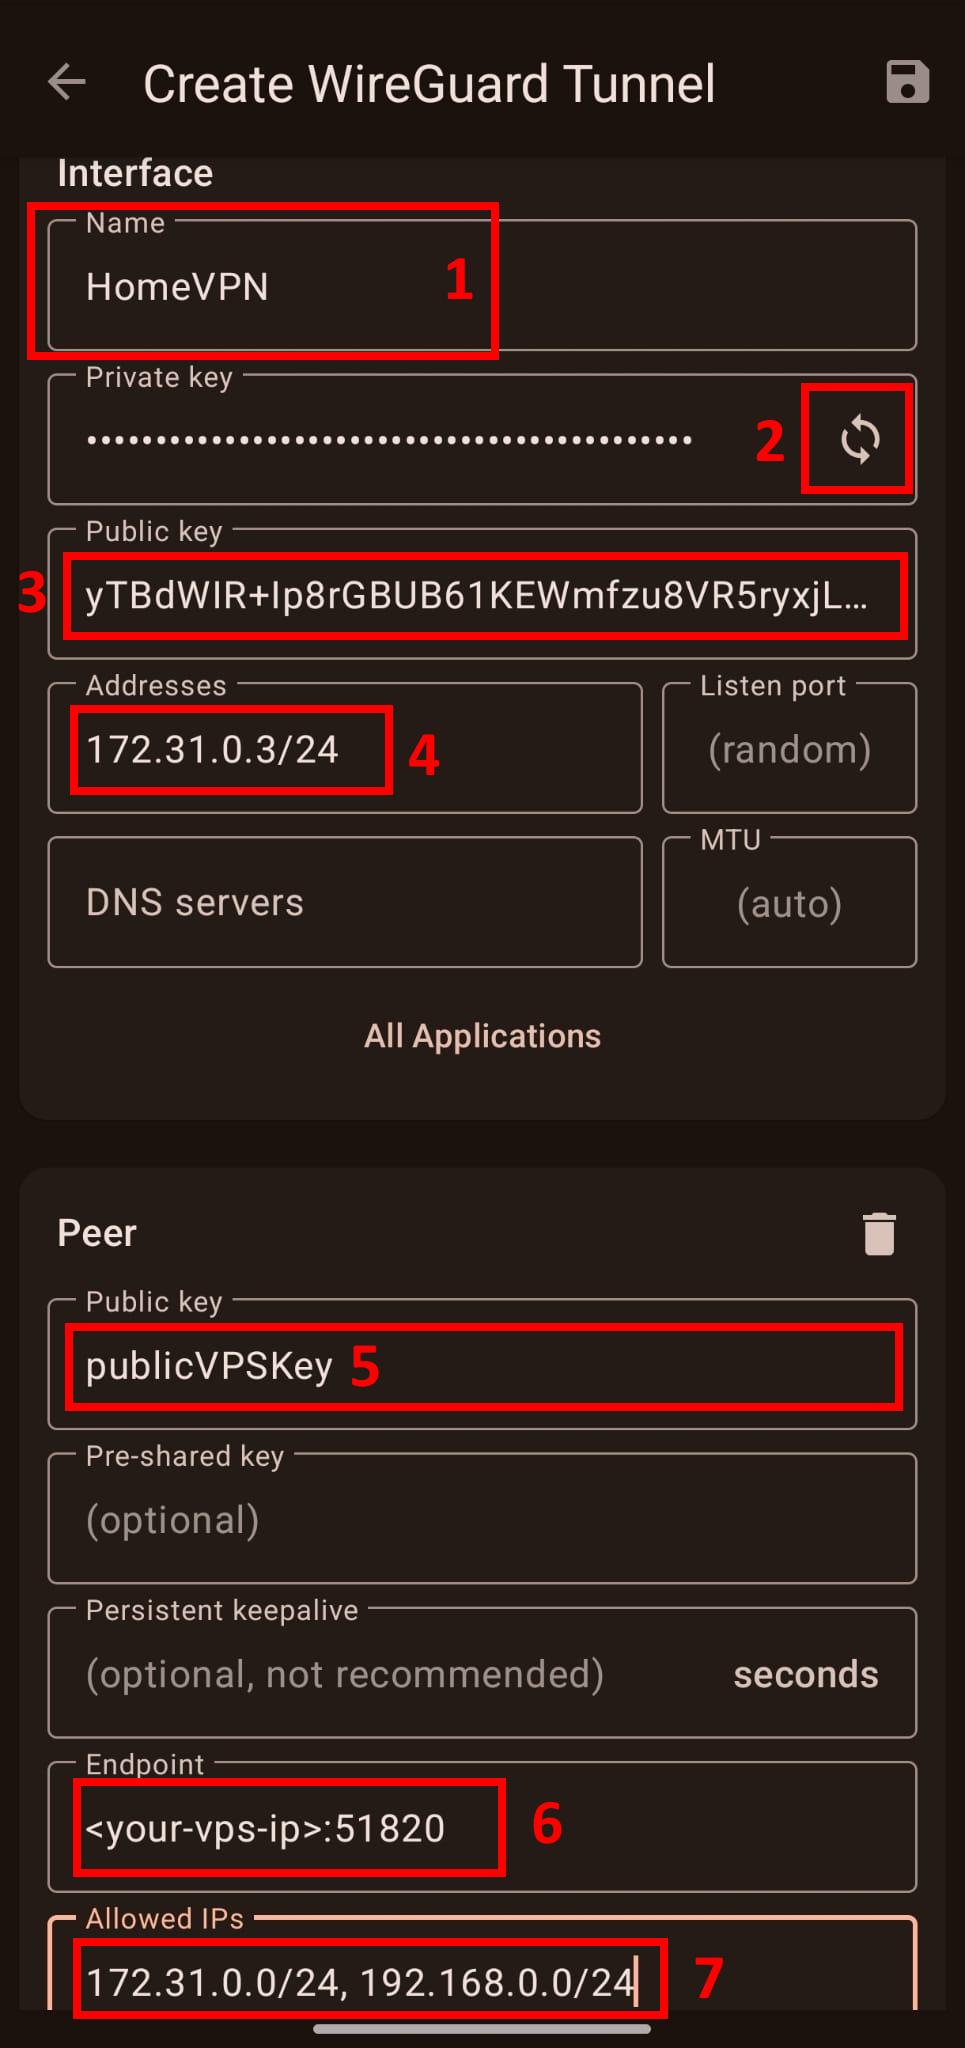
Step 1 Name your VPN connection
Step 2 — Generate the key pair
Tap the refresh icon next to the Private key field. The app generates a private key and derives the public key automatically. The private key never leaves your phone.
Step 3 — Copy the phone’s public key
You need paste this into the VPS config now:
On the VPS, open wg0.conf and fill in the phone peer’s PublicKey:
sudo nano /etc/wireguard/wg0.confPaste the copied public key under the # Smartphone peer block:
[Peer]
PublicKey = <paste phone public key here>
AllowedIPs = 172.31.0.3/32
Reload WireGuard on the VPS to apply the change without dropping the Pi tunnel:
sudo wg-quick down wg0
sudo wg-quick up wg0
Verify the phone peer is now registered:
sudo wg show
# The phone peer should appear with the correct allowed IP, handshake pending.
Step 4 — Enter the phone’s VPN IP from the wg0.conf
Step 5 - Add the VPS Host’s public key generated here
Step 6 - Enter the VPS’ IP and WireGuard’s UDP Port opened in the Firewall
Step 7 - Enter allowed target IPs as needed
The target IPs you enter here determine what traffic from your phone goes through the VPN.
WireGuard checks the destination IP of each packet against this list to decide whether to route it through the tunnel or send it directly over the phone’s normal internet connection.
You can add both the VPN and home network as targets like on the screenshot above.
But you can also choose specific IPs or target subnets to route through the VPN.
If the connection is successful, sudo wg show on the VPS will show a latest handshake timestamp for the phone peer within a few seconds.
Test End-to-End
Disable Wi-Fi on your phone, activate the VPN, then try reaching your home network.
From the phone (WireGuard app must be active):
- Ping
172.31.0.1→ should reach the VPS - Ping
172.31.0.2→ should reach the Pi - Open a browser and navigate to a home device by local IP, e.g.
http://192.168.0.3
From the VPS, verify all peers are connected:
sudo wg show
# Both the Pi and phone should show recent handshakes.
From the Pi, verify you can reach the phone:
ping -c 4 172.31.0.3If the phone can reach 172.31.0.1 but not 192.168.0.x, the most common causes are:
- The Pi’s
PostUpMASQUERADE rule didn’t apply — checksudo wg showon the Pi andsudo iptables -t nat -L -vfor the MASQUERADE rule. - The VPS config is missing
192.168.0.0/24in the Pi’sAllowedIPs. - The
AllowedIPsin the phone config doesn’t include192.168.0.0/24.
Config Files Overview
VPS (172.31.0.1) — Hub
| Setting | Purpose |
|---|---|
ListenPort = 51820 | Accepts connections from Pi and phone |
SaveConfig = false | Protects manual config from being overwritten |
FORWARD + MASQUERADE | Routes and NATs between tunnel peers |
Pi AllowedIPs = .2/32, 192.168.0.0/24 | Sends home-subnet traffic to the Pi |
Phone AllowedIPs = .3/32 | Routes only to the phone’s VPN IP |
Pi (172.31.0.2) — Home Gateway
| Setting | Purpose |
|---|---|
MTU = 1420 | Prevents fragmentation (WireGuard overhead) |
MASQUERADE on eth0 | Makes home devices reply to the Pi, not the VPN IP |
AllowedIPs = 172.31.0.0/24 | Only VPN subnet goes through the tunnel |
PersistentKeepalive = 25 | Keeps the outbound tunnel alive through NAT |
Phone (172.31.0.3) — Mobile Client
| Setting | Purpose |
|---|---|
AllowedIPs = 172.31.0.0/24, 192.168.0.0/24 | Split tunnel: VPN + home LAN only |
DNS = 1.1.1.1 | DNS resolution while on VPN |
PersistentKeepalive = 25 | Keeps connection alive on restrictive mobile networks |
Troubleshooting
-
wg-quick: 'wg0' already existsA previous session didn’t clean up. Runsudo ip link delete dev wg0, then restart:sudo systemctl restart wg-quick@wg0. -
RTNETLINK answers: File existsduringwg-quick upAnother interface owns the route. Runip route show 172.31.0.0/24to find it. Clean up withsudo ip route del 172.31.0.0/24if it’s a leftover. -
No handshake on Pi Check that UDP port
51820is open on the VPS (sudo ufw status). Also confirm theEndpointin the Pi config is the correct VPS IP or domain. -
Phone reaches VPS but not home devices Three-step check:
sudo wg showon VPS — does the Pi peer list192.168.0.0/24inallowed ips?sudo iptables -t nat -L POSTROUTING -von Pi — is the MASQUERADE rule present?- WireGuard app on phone — does
AllowedIPsinclude192.168.0.0/24?
-
iptables: Bad ruleonwg-quick downThis error appears whenPostDowntries to delete a rule thatPostUpnever added (e.g., startup failed mid-way). It is harmless. -
Ping doesn’t work from phone on first try WireGuard is a “stealth” protocol — it doesn’t send keepalive probes proactively until data flows. Send the first ping from the phone (outbound), which punches through the carrier firewall. Subsequent pings will succeed immediately. This is expected behavior.
Conclusion
You now have a fully working zero-dependency WireGuard site-to-site VPN-Setup:
- The Pi keeps a permanent outbound tunnel to the VPS, bypassing DS-Lite
- The VPS routes any packet destined for
192.168.0.xdown the Pi tunnel - The phone connects to the VPS and reaches your entire home LAN transparently
The only open port required is 51820/udp on the VPS. No port forwarding, no dynamic DNS.
Created: 01.04.2026
Last Updated: 01.04.2026